How To Mass Mail In Gmail
December 15, 2022Welcome back to the Damson Cloud blog, a one-stop for Google Workspace tips and tricks! This week, in another instalment of our Tech Tip Thursday series, we’ll be looking at how to mass mail in Gmail.
We’ve created this useful guide to help with daily productivity in Gmail, as mass sending one email is far quicker than individually sending multiple smaller ones.
Key takeaways from this guide:
- How to use your current Workspace environment to send mass emails
- Learn how to create an audience or upload bulk contacts
- How to create your email layout in a professional manner
- Use labelled contacts to swiftly add recipients to a mailing group and save for later
- Use “multi-send” to create unique personal emails from one draft, and comply with GDPR regulations in your region
Sending mass mail
There are many instances where a mass email is a great way to communicate with large groups of people/users within the Workspace environment.
Maybe you’re organising a client event that requires personalised invites to multiple contacts, or perhaps you have a notice for the attention of your entire organisation.
In cases such as these, the mass mailing feature on Gmail is an effective, safe way to communicate, and combined with the contacts and layout features, you can do this in a presentable, professional manner which saves time and energy and allows you to focus on other tasks.
Creating an audience
We’re first going to look at how to create an audience using Google Contacts. Contacts can be added individually or through bulk uploading using a Google Sheet.
Once added, organise contacts into an audience or mailing list by applying a label. The label name will be recognised in the ‘To’ field of your email and pull multiple contacts into your ‘To’ field.
Bulk uploading contacts
Next, we’re going to look at how to bulk upload your audience onto Google Contacts using a CSV file.m
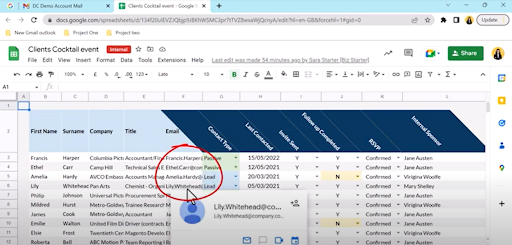
Before downloading the CSV file containing your selected audience, it’s important to isolate the essential data first. To do this, we’re going to add a worksheet.
For the CSV file to pull in the right data, it must have the appropriate headings on the worksheet so Google can easily read and organise the information for you. We recommend visiting support.google.com/contacts and downloading the template to assist with this.
From the template, copy the headings and paste these into your worksheet as shown below.
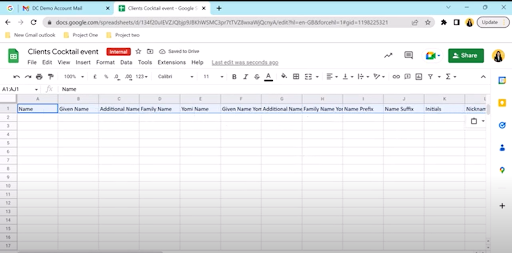
With these headings in place, you can now begin to copy and paste information from your prospect audience for the email. Essential information fields include Given Name, Family Name and Email.
Please note: There are two email columns on the downloadable template. You should enter your email address into the “Email 1 - Value” column.
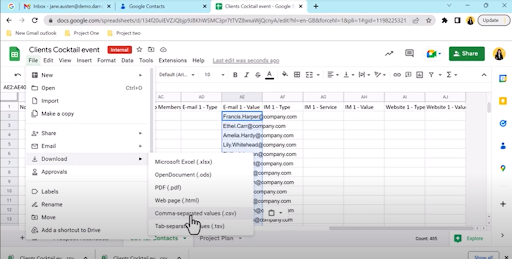
From the file menu, click Download and from here, select CSV as shown below to download the worksheet in the correct format to be bulk uploaded.
Creating labels
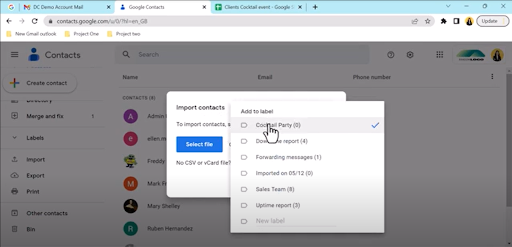
Once you have added your audience to Google Contacts, the next step is creating a label to associate with your audience.
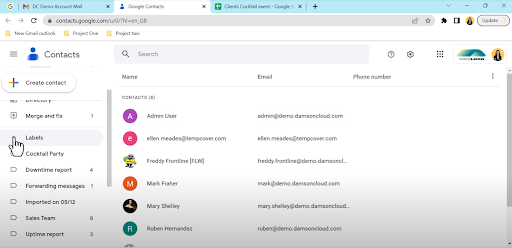
If you already have a label created for your mailing list, while importing your contacts, select the name of this label as shown below. The details will then be imported into your contacts and the label applied.
Creating a mass mail
We have now successfully uploaded our contacts as a CSV file and added them to a label. The next step is to add them to our mailing list in Gmail.
First, select the ‘Compose’ option. In the ‘To’ field, type the name of the label, Google will display the label name and the amount of contacts within this label in a contact chip. Once you are happy with your chosen contacts, it’s important to send these in a safe manner that does not breach GDPR regulations. This can be achieved using the ‘Multi-send’ function on Gmail.
Using Multi-Send
With the multi-send feature on Gmail, each recipient will receive a separate copy of the email which means their email address will not be exposed to other contacts included in your mass mailing.
Multi-send also allows you to personalise the emails using mail merge tags including first name as well as a unique ‘unsubscribe’ option for each contact should they decide they want to opt-out of future email communications.
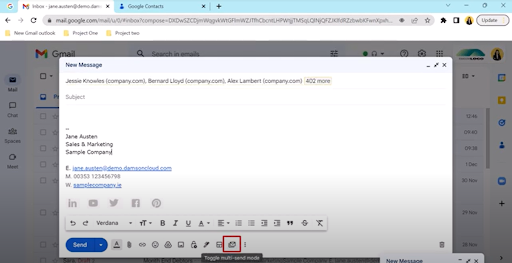
You can easily activate the multi-send feature at the bottom of the compose window by selecting the highlighted icon below. Once this has been activated, a banner will appear stating ‘You’re using multi-send mode’, indicating the feature is in operation.
For additional tips on how to send mass mail in Gmail, check out our YouTube video. There are also plenty more helpful guides to help you within Google Workspace.
Final thoughts
We hope you enjoyed this Tech Tip Thursday update looking at mass mail in Gmail. Mass emailing is a great way to increase productivity and communicate in a more efficient way within the Workspace environment. Let us know how you fare!
As always, we want to hear from you. Is mass mailing something you or your business would be interested in learning more about? Let us know in the comments on our YouTube channel or contact us for more information here.
As a longstanding member of the Google Cloud Partner Program, Damson Cloud specialises in bringing people and ideas together through new ways of working. We champion the very best practices in remote working and change management, helping companies and their teams collaborate productively from anywhere in the world. To find out more about our services, check out our library of tutorial videos or our blog.