Getting Started with Chat in Google Workspace
April 13, 2023Google Chat as part of Google Workspace may have gone under your radar. Many businesses have found themselves using 3rd party chat software such as Slack, Teams and Zoom instead of using the software that was at their fingertips the whole time: Google Chat. It’s taken time, but now Google Chat competes exceptionally well with all the major instant messaging solutions available because of the fact rooms are now “Spaces” and also provides features the others don’t. In our video today, we’ll be discussing how to get started with Google Chat and how it can help your business.
Key things you’ll learn in this video:
- How to access Chat & Spaces
- Creating your spaces
- Starting to interact with your space and its members
Getting Started
How you access your chat and spaces is an important part of getting started. Chat can be access through a browser or a desktop or mobile application.
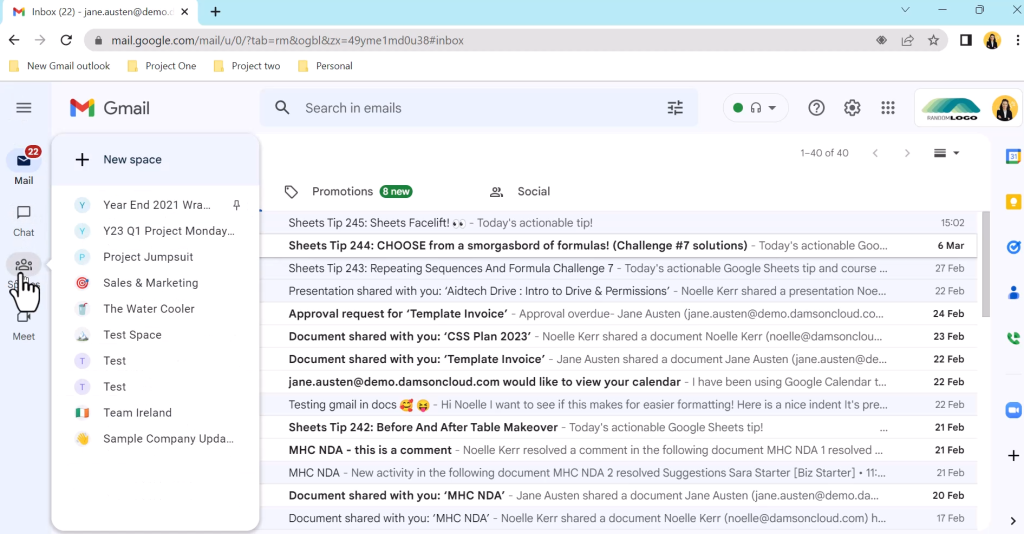
The first browser option is to use Chat through the Gmail interface integration. Access Chat from the main menu without leaving your gmail application. This access is possible in a browser window on your computer or in the gmail app on your phone to keep communication flowing on the move.
With the main menu open or collapsed, clicking or hovering over the icons for chat/spaces gives a smooth journey from gmail to Instant message without opening new tabs.
Click on a person or space to open a full screen view of your conversation and access to all the Chat functionality (which we will look at shortly)

Accessing Quick settings allows customisation of which applications are available in your gmail interface. Untick Google chat to remove the chat/spaces icons or untick google meet to remove quick access to your scheduled meets or quick meet function.
For some, the integrated view is distracting so they turn off the apps in Gmail and access the chat in its own browser. This can be achieved by going to mail.google.com/chat. This gives a full view of chat in its own tab. The menu can be uncollapsed now as there is lots of dedicated space here. The menu splits between Chat, Spaces, and Meet, each section can be hidden or revealed with the chevron. Or you can hide the menu and use the space icons or hover menu instead.
Save yourself time opening a chat tab when starting chrome by adding this to your own startup tabs, access the menu to the right of your Chrome avatar, scroll to settings. From the left hand menu select “on startup”.
- From the on startup menu select the third option “open a specific page or set of pages” and “add a new page”.
- In the pop up add the chat URL click Add
- Chat will now be auto opened (along with any other tabs you have requested) when you start up Chrome
If you don’t want to add yet another tab to your browser you might consider downloading the native app for your desktop. From chat.google.com/download you can install the app.
To install the Chat standalone app, make sure:
- Your device is running Google Chrome 73 or up.
- Needs need to be open to use the Chat standalone app.
- If you can't complete the installation on your work or school account, contact your Google Workspace administrator.
- The interface is identical to the web browser chat application, however it is accessible from the task bar once open, and can be pinned to the taskbar for quick access.
Now, the important thing here is to remember to Launch the application as you begin your day. To ensure a smooth start you can automate the application opening.
- Open a tab in chrome in the omnibar type Chrome://App
- Right click on Google Chat
- Select Start app when your signin
Lastly for on the go access in a stand alone application Download the google chat app from app store or Google Play.
- The application will open in the chat menu with “pinned” chats at the top followed by all other chats in order of most recent activity.
- Click the spaces icon to see a similar layout of all the spaces you are a member of.
- Easily flip from chat to files to tasks. From the hamburger menu access notifications chat settings and general settings.
Setting up Spaces
Now we have considered where we will access our space, let's get on with setting one up, understanding who can do what in a space, how to make a space private or discoverable, adding members to your space (inc external members) and personalising your settings we’ll set up the space in the Gmail integration as this is where we like to work on Spaces. The steps are the same across all the different access points.
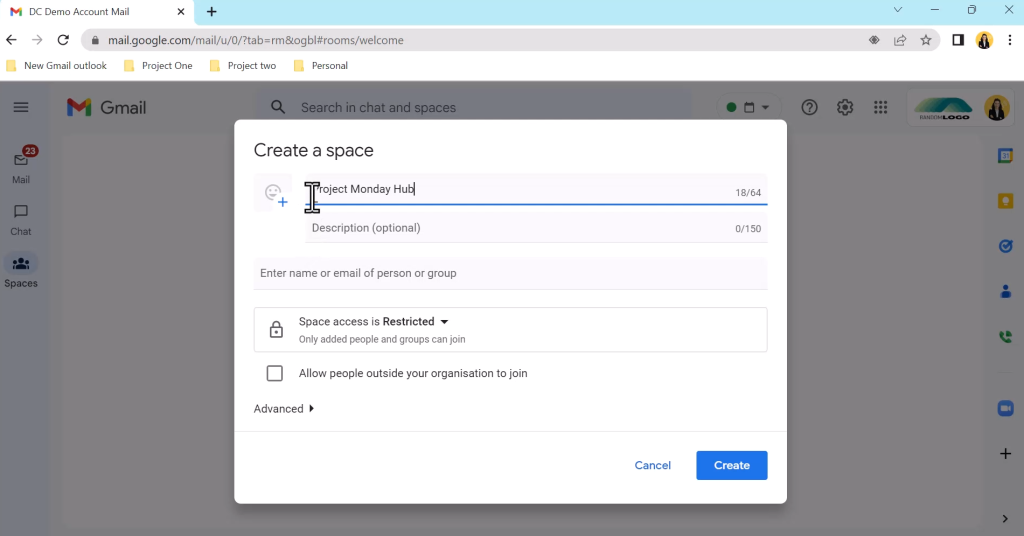
Click the plus button to start a new space, select create a space and a pop up window will appear with all the custom elements you will need to add or choose to set up your space.
- First, give your space a name, there are generally a few types of spaces that teams will create
- A team space - to discuss team relevant issues
- A water cooler space - to allow more company wide communication and replicate those water cooler moments you
- A project space - a project specific space with interdisciplinary members
- And in an upcoming release An announcement Space - an organisational communication space where posting is limited to space managers
- If you are creating many spaces you might consider using a numeric or alphabetical indication to manage similar sounding spaces or use a year or quarter naming convention.

Next add a description for members of your space to understand what the space is about. This is important if you are creating discoverable spaces. Now you can begin to add members to your chats.
Let's take a moment to understand what roles are there in Spaces and what functions are available to those roles:
There are currently two roles in spaces. Space manager and Space members. As you might expect the space manager has most functionality. Space managers can
Add new members
- Send a message to all members in a space using the @all function
- They can delete messages and manage the chat history settings. A space manager can give additional manager permissions to other members
- They can also update the space’s access setting and remove members
- They can manage their personal notifications
- And edit the description and any guidelines for the space. They can pin a space in the left hand navigation for ease of access
- Lastly the space manager can leave a space, while the space remains available for other members
- Block or report a space
- Delete a space for all members
Space Members can
- Add participants and remove them. Reach out to all members using the @all function and edit space descriptions & guidelines.
- Currently members can also turn on/off chat history
- With upcoming updates to google chat, space managers will be able to limit this functionality
- Each member can set personal notifications & pin spaces
- Members can block or report spaces and ultimately leave a space
After adding members, consider the accessibility of your space. Spaces default to restricted meaning only people or groups who have been added to the space can join. This is best for Project spaces or spaces that require a level of privacy
Alternatively you could make your space discoverable, allowing anyone in the organisation to find and join the space by using a link, this access setting is ideal for general chat or communications spaces.
At this stage as the space creator you can take the decision to make a space internal ONLY or to allow for external stakeholders to be invited to join. Please note this will affect your access setting. If allowing external stakeholders the space MUST be restricted.
If you allow external members you can now add those members, who can choose whether or not to accept the invitation. External members do have limited permissions, a key limitation is that they cannot add or remove space members.
Click create and your space is created
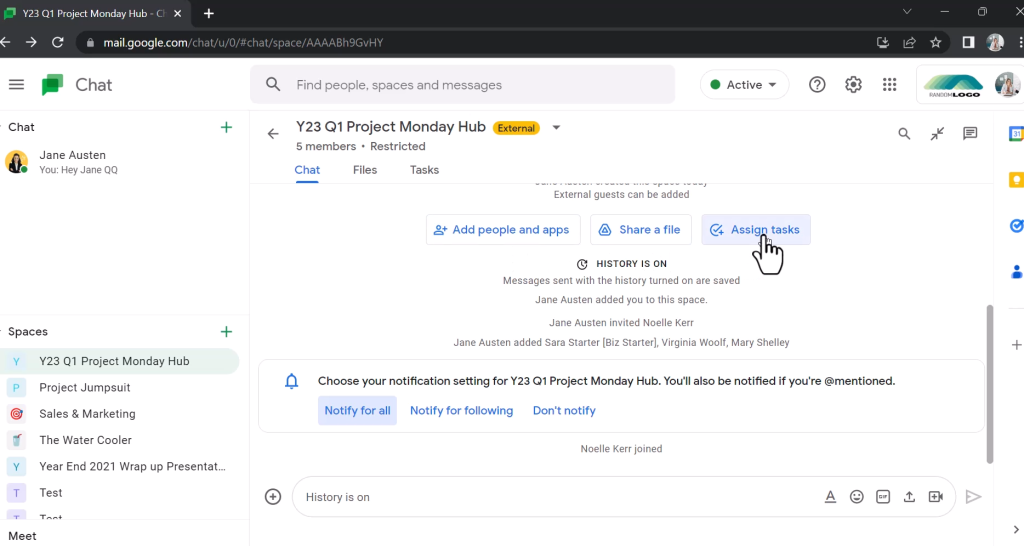
Notice in this space there is an external banner noting that this space is set up to host external members.
As we join the space we can see options to add more people, begin adding files or assigning tasks. These buttons are locked to the beginning of the conversation, so will soon be moved up as the interaction in the space becomes more plentiful.

In this first view I am also offered a prompt for setting my notifications, this will appear for the creator and for new members when they first enter the space.
Notifications can be set for all interactions in the space, only interactions on threads I am following OR limited to interactions in which I am @mentioned.
After this initial view notification options and other settings can be accessed from the arrow next to the Space title. Some top setting here include: adding/removing members, pinning spaces to the top of the space list for quick access, updating notifications and turning off chat history and of course leaving the space.
Using Chat and utilising Spaces
When working in the integrated gmail view a new message will pop up in a notification bubble. I can quickly see the message, use the reply button to open a pop up , respond in text or emoji and minimise the window back down into a bubble while I wait to see what responses come back from the group members. The gmail integration is great for quickly viewing and responding to chat. Alternatively I could have clicked the bubble or the text to open the chat in a full window.

When arriving in the Space interface there are a few elements to look out for
- Look for an external label : If there is one this is an indication that there may be external stakeholders in this channel so be careful with internal confidential information
- Look at the number of members: If you see large numbers of members in a channel this is more likely a general or comms channel. If there are many members in a space, be mindful of what you are communicating, is the comment or information appropriate for general communication?
- Look for the unread marker: this indicates that there are more recent messages that you have not seen yet.
Jane is replying to a message she can reply in the main conversation thread by using the text box at the bottom of the conversation. Rich formatting options allows for expressive communication, she can add emoji or communicate non-verbally with a gif. Clicking the right hand arrow will send the messages.
Alternatively Jane can choose to reply directly to the message in a threaded side conversation. This allows for side conversations to happen without disturbing the central communication. Direct replies also allow team members to communicate with emoji or gif.
When making a direct reply and creating a side conversation the user is defaulted to following this thread - this allows the user to be notified when more responses are generated on this thread. If Jane has no further interest in this thread she can simply unfollow but if she continues to follow the conversations she can see new replies indicated by the new replies icon and will potentially receive notifications (if she has selected this notification option)
In addition to the chat thread, spaces has a file inventory providing a central repository for all files added to the space . Files can be added in the conversation or directly here. Also members can view all tasks associated with the space.
Adding a task to the space will allow the member to give a title and description, set a deadline and assign to a member within the space
So now you have mastered the top functions to create spaces for communication , know how to make these internal or open channels , interact quickly and securely, access shared documents and add tasks assigned to space members.
Hopefully this video and tutorial would have been useful for you. Google Chat is a fantastic way to communicate with people in your business in a format that they’ll be familiar with and with features that rival other software. Google Workspace helps businesses consolidate their software requirements into one place. To learn more about how Google Workspace can help you, get in touch here
